


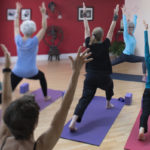
Yoga is the perfect activity to stay in shape after 50 years! Here are some easy exercises to improve your fitness. These yoga postures primarily target the daily pains often experienced by seniors. Little more? You will feel more flexible, reliable, and de-stressed!
Fifty is the perfect time to get into yoga: it can be a way to surpass you or relax, it’s up to you to choose the difficulty! You will feel more flexible and more in tune with your body – and also, yoga empties your mind.
The benefits of this discipline are many: it reduces anxiety and stress, helps manage pain, improves sleep, and stay slim. And do not worry, whether your novice or amateur, these yoga postures are specifically designed to relieve the pain you experience daily.
1. Warrior II Posture
Why: This yoga posture is ideal for sculpting the muscles of the abdominals, thighs, and buttocks, but also for improving posture.
How: stand up, take a big step back with one leg. Point your front right foot in front of you and turn your back foot so that it forms a 45 ° angle with the rest of your body. Bend the front leg until your knee is perfectly aligned with your ankle while keeping the other leg straight. Turn your bust sideways and raise your arms to form a “T,” that is, an arm in front of you and behind. Then look straight ahead. Be sure to spread your weight on both legs and take deep breaths.
For beginners: To make this yoga posture even more comfortable, keep your hands on your hips by setting a point in front of you.
2. The posture of the tree
Why: This yoga posture is recommended for seniors because it allows working the balance and thus prevents falls.
How to: Start standing, both legs pressed against each other. Then, slide your right foot along your left leg, so that your heel runs along the inside of your calf. Put your arms up to your head and join your hands. Stay in balance for a few deep breaths, then start again with your other leg.
For regulars: you can slide your foot up to your leg, see to the knee.
3. The posture of the overthrown dog
Why: this position allows you to open the shoulders and chest, stretch the hamstrings, back and strengthen the wrists.
How: Get on all fours, then push on your hands to straighten your arms and on your legs to lift your buttocks to the ceiling. Gently tuck your head between your arms so that you are close to your knees. If you can not keep your heels on the ground, it does not matter, just focus on lifting your hips as high as possible and keeping your arms and legs tight. Fix a point behind you, between your legs.
For novices: instead of keeping your hands on the ground, you can put them on a small bench or raise them slightly.
4. The posture of the low slot
Why: To hone your hips and improve concentration, this is the perfect yoga posture, especially if you sit in front of your desk all day long!
How: start by kneeling on a carpet or towel. Place one leg in front of you, foot on the ground and knee at right angles, aligned with your ankle. Place your hands flat on the ground to keep the balance and move your other foot so that you can reach your leg. When you feel ready, take your hands off the floor and put yourself in the slot position. Put your arms up to your head and take deep breaths. Then, do the same thing by inverting your legs.
For beginners: If you are afraid of losing your balance, you can keep your knee on the ground rather than stretching your back leg.
5. The posture of the sitting twist
Why: This yoga posture relieves back pain, improves posture, and relieves stress.
How to: sit cross-legged on your carpet. Then, raise your left leg and run it over your right leg so that your left foot is placed along your right calf. Turn your bust until your right shoulder touches your left knee. While inhaling deeply, push your left hand into the ground while keeping your back straight and your shoulders open. Do a similar thing on the other side.
For novices: leave the leg on the floor tense.
6. The posture of the bridge
Why: to improve digestion, sometimes tricky in women after 50 years, but also to strengthen the lower back and lower stiff hips.
How: Lie down, knees bent and feet flat on the floor, on the same alignment as your hips. Keep your arms around your body. While inhaling, push the ground with your hands, then exhale and, while squeezing your abdominals, tilt your pelvis to take off your spine from the ground. Hold the bridge posture for 30 seconds, then slowly lower, starting with the shoulders, until your back is flat again on the mat.
For novices: If you suffer from back pain, you can roll a towel and place it under your shoulders to make the exercise more comfortable.


Related Articles

Types of Hiking Trails: Options to Explore
Hiking captures the hearts of people across ages and fitness levels as...

Benefits Of Cycling For Physical and Mental Health
Cycling, a broadly embraced hobby, brings forth manifold blessings for each physical...

5 proven strategies to teach your child skiing.
It’s done, your holidays in the mountains are reserved! To you, the...

Five Activities To Do With Children
Going skiing with kids can often be stressful for parents. But do...